|
PHOTO CALL EVENTS! PRINT! |
[ENG] |
We will explain how Photo Call Events works, starting with
the program settings (accessed by clicking on the "SETTINGS" button in the main
window).
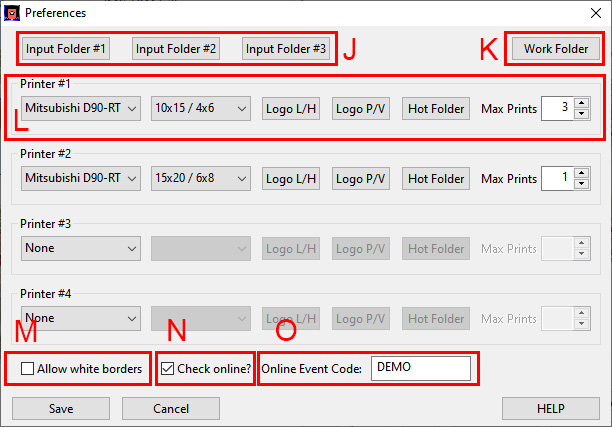
ZONE J: Input Folder . Here you choose the folders where the new photos you are taking are located. It can be the folder of a memory card inserted in the computer, a network folder, or a Wi-Fi network drive of your digital camera.
ZONE K: Work Folder. Choose a working folder on your computer. It is in this folder where all the photos that are read from the input folders will be copied. 4 subfolders will be created, numbered from 1 to 4, corresponding to the 3 input folders and the 4th the folder of the downloaded online photos. This way you will have separated the photos that each source has taken.
ZONE L: Printer. Settings for up to 4 working printers.
-Printer: here you choose the printer model you have connected.
Currently our program supports Mithubishi D-90 printers, and indirectly any
printer with hot folders. Contact us for more help or new printers.
-Size: Choose any size supported by your printer (4x6 in, 6x8
in,...). The size is expressed in "Centimeters / inches"
-Logo L / H: Choose a .PNG file with transparency to overlay photos in Landscape (horizontal) orientation.
-P / V logo: the same but for portrait photos (vertical)
-Hot Folder: here you must choose the hot folder of your printer that
corresponds to the size previously chosen. For example, if you choose 10x15
size, you should choose the folder on your printer that prints 10x15 cm
photos.
-Max prints: It is just an advanced feature. For now
keep it to "1", although there is a detailed explanation at the end of the
document.
It has the same values for printers # 2 and # 3. They can be the same
printer with a different size or a different printer.
Recommended image sizes of logos / overlays for Mitshubishi D-90 printers in pixels are (for other
printers, ask us or refer to your printer's user manual):
-13x9cms (5"x3.5"): 1500px x 1076px
-15x10cms (6"x4"): 1852px x 1226px
-18x13cms (7"x5"): 2128px x 1500px
-20x15cms (8"x6"): 2428px x 1852px
ZONE M: Allow white borders. In the main screen, the cropping area does not allow to leave the photo (they would always be printed without white borders). With this option enabled, the program allows you to get out of the photo, so it could be printed with white borders.
ZONE N: Check online. If you have booked an online event, this allows the program to check the photos uploaded by the guests.
ZONE O: Online event code. Enter the event code here to download the photos.
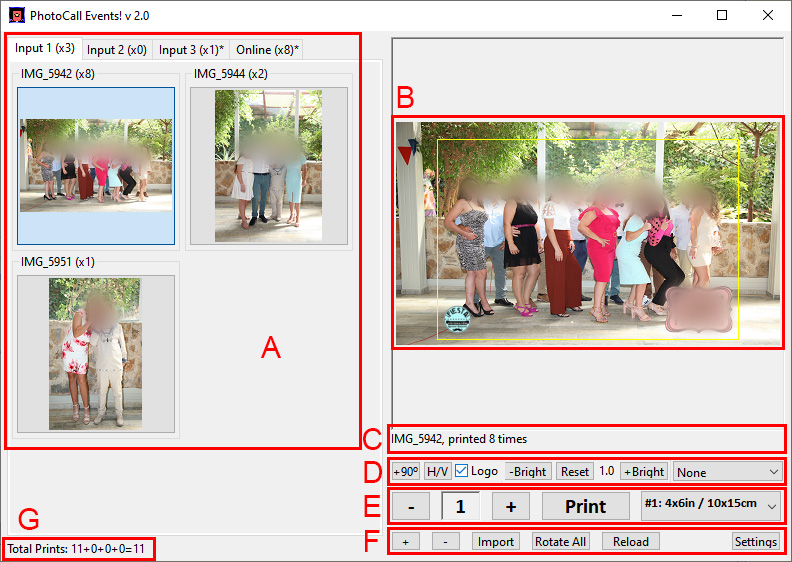 Zone
A: Thumbnail view. The tabs correspond to the work folders of the
3 input folders and the 4th, which is the tab for online photos. The number
in parentheses is how many photos are in the folder. If it has an asterisk
*, there are new photos that you have not seen yet. On the top left of each
image, you can see the name / number of the photo. Next to it, in
parentheses, the number of copies that have been printed.
Zone
A: Thumbnail view. The tabs correspond to the work folders of the
3 input folders and the 4th, which is the tab for online photos. The number
in parentheses is how many photos are in the folder. If it has an asterisk
*, there are new photos that you have not seen yet. On the top left of each
image, you can see the name / number of the photo. Next to it, in
parentheses, the number of copies that have been printed.
Zone B: Selected Photo. The photo you have selected on the left appears here. A yellow frame shows you where the photo will be cut once printed. You can move it with the mouse, or change the size (zoom) to change the cut frame size. If you have the LOGO overlay enabled, it will also be seen here.
Zone C: Information. Again, the name of the photo and the number of times it has been taken on paper.
Zone D: Photo settings. Here are several adjustments you can
make to the displayed photo.
-90�: if the photo is not correctly oriented, with this button
you can rotate it so that it is displayed correctly.
-H / V: Here you can switch the crop between horizontal / vertical.
-Logo: check this box to have photos displayed / printed with logo
superimposed.
-Bright: You can make the photo darker (-Bright), set it to its
normal value (Reset), or make it lighter (+ Bright)
All this values (orientation, brightness, crop,...) are stored for future
printings.
-Show complete: from this button you can show the chosen photo in
full screen. Choose the right monitor (normally // Display 0 is the normal
screen, // Display 1 is the 2nd monitor, and so on)
Zone E: Printing. With the "-" and "+" you change the number of photos to be printed of the selected photo. With the "PRINT" button you print them. With the following button, you can choose the printer on which the photos will be printed, from those selected in the settings.
Zone F: Various utilities.
-The small "+" and "-" buttons change the size of the thumbnails on the left.
It may be necessary to click reload below for the thumbnails to be
created correctly.
-Import is used to read the new photos from their input folders. Only
photos in JPG and PNG format are read / copied. The new photos will be
copied to your work folder on your computer. If you have the online option
activated, it will also check for new photos online, and download them to
your computer (they appear in tab 4).
-Rotate All: in the event that the thumbnail photos have not been
rotated correctly, you can force the program to try again, with this button.
-Reload: deletes all the photos from the program (it does not delete
them from your computer!) And reloads them again. Ideal if you have copied
new photos to your work folder from another application.
-Settings: enter the program settings.
Zone G: Total prints (total copies), the total of printed copies, detailed by folders and as a total sum.
ADVANCED SETTINGS
MAX PRINT
We are going to explain the "max prints" setting, which
will improve speed while printing.
Normally you must select a printing folder (hot folder) that will be the one
that the program will use to print the photos. This folder can have any name,
for example "10x15"
You may have your printer configured with multiple hot folders, to print
varying amounts of photos. For example, "10x15 x1", "10x15 x2", "10x15 x3"
and so on.
If this is the case, in "max prints" you should put the highest value among
your hot folders (in the example, it would be 3).
Note that the number must come at the end of the folder name (for example,
"9x13 x1" or "15x20-1" are valid, but not "13x18 2x").
In the "Hot Folder" button you must select the "1 copy" folder (in our
example, "10x15 x1").
The explanation is simple. If you have defined a folder with,
for example, 6 copies, and you need to print 6 copies, the printer will know
that it has to print 6 copies of the same photo, not needing to create the print
image more than once internally, and printing, if you use 15x20 paper for 10x15
photos, two copies per sheet. Otherwise, the printer will print 6 "different"
photos, even though it is actually the same image.
In short: create on your printer, for each size you use, as
many folders as you want, each one with a different number of copies and named
accordingly. For example "10x15 x1", "10x15 x2", ... "10x15 x6". As hot
folder choose the first folder, the one with only 1 copy, and in "max
print" choose the number of the highest folder.
WORKING ONLINE
Mitsubishi printers normally connect to your computer using a WiFi
connection. If this is your case, and you also want to work with online
photo downloading, you must have 2 network connections on your computer: or
2 WiFi or 1 WiFi (for the printer) and a network cable for internet access.
The usual thing is to have a laptop with internal WiFi for the internet and
a USB-WiFi for the connection with the printer.
Make sure you have access to the internet and your printer's Hot Folders
before you start.
If your printer connects via USB, you shouldn't have a problem.
WORKING WITH NETWORK UNITS
If you use network drives, such as a printer with Hot Folders, or for
input folders, make sure they are available before using our program. If
they are not active, when trying to access them, Windows may freeze the
application for up to 30 seconds trying to restore the network connection.
If a network drive is no longer available, deactivate it from the settings
of our program, choosing any local folder.